Image Analyst MKII uses flowchart-based pipelines to automate all
aspects of image processing. Built-in pipelines (see Pipelines main
menu) support a range of biological applications from basic image
processing maneuvers to complete assay analysis. The behavior of
built-in pipelines can be controlled through the parameter bar in a
similar way to any other image processing
function, and the flowchart
structure of the pipeline remains hidden for basic use. Any of the
built-in pipelines can be opened in the Pipeline Window,
modified and saved under a new name or custom pipelines can be
created from scratch. This page explains how to create new or modify
existing pipelines working with the flowchart structure. For basic
pipeline usage please see the
Parametering Image Processing Functions and Pipelines page.
During basic pipeline usage only select (master) pipeline parameters
can be modified, but not the pipeline structure or the individual
function parameters within the pipeline.
The Pipeline feature provides a flowchart-like automation of
image processing.
- Easy, drag-and-drop style editing, no programming skills
required
- Fast, parallel processing
- Processing of all stage positions and whole or partial
microplates
- Modify existing built-in pipelines or build new ones from
scratch.
- Select key function parameters as pipeline master parameters
for quick access from the
parameter bar.
To access the Pipeline window:
- To create a new blank pipeline, in the Main menu use the PipelineDesigner/'New
Pipeline window' menu item, or press the
 main toolbar button if no pipeline has been activated on the
parameter bar.
main toolbar button if no pipeline has been activated on the
parameter bar.
- Use the
main toolbar button or Tools/'Show Selected Pipeline'
to show the Pipeline Window corresponding to the
pipeline activated on the parameter bar. Note:
any modification to the built-in pipeline will be automatically
saved, therefore it is advised to resave the pipeline using the
 save as button of the Pipeline Window tool bar. The Pipeline
Window prompts the user to do this, but this is not
mandatory.
save as button of the Pipeline Window tool bar. The Pipeline
Window prompts the user to do this, but this is not
mandatory.
- Pipelines can be loaded into a blank Pipeline Window
by pressing the
 open toolbar button in the Pipeline Window, or by
dropping *.ips files to the main window.
open toolbar button in the Pipeline Window, or by
dropping *.ips files to the main window.
- To find an already opened Pipeline window use the
PipelineDesigner/Show menu item.
- Many pipeline windows can be open in the same time, but only
one menu-selected pipeline will be shown on the
parameter bar of the main
window.
- It is suggested to use a secondary display for Pipeline
Windows.
To run a pipeline in a Pipeline Window (not selected in
the main window parameter bar) :
-
 on the Pipeline Window toolbar will execute the pipeline on the
top
Image Window. The same
button in the main toolbar will repeat the pipeline from the
last used Pipeline Window if no pipeline is selected in the main
parameter bar.
on the Pipeline Window toolbar will execute the pipeline on the
top
Image Window. The same
button in the main toolbar will repeat the pipeline from the
last used Pipeline Window if no pipeline is selected in the main
parameter bar.
-
 on the Pipeline Window toolbar allows automated loading of the
image data followed by pipeline execution. The pull down menu of
this button allows processing single, multiple or all stage
positions in a recording. To automatically load recordings the
last opened Multi-Dimensional Open
dialog is used, unless tags
are set for dialogs and a tag is set in the 'Input Image'
functions of the pipeline by selecting e.g. "[Multi-Dimensional
Open]#1" as Image Window parameter, where 1 is
the tag. In this case the Multi-Dimensional Open
dialog with the corresponding
tag is used. When [Actual window] set as Image Window
parameter, the pipeline
always starts processing with the topmost Image Window
after performing loading of image data.
on the Pipeline Window toolbar allows automated loading of the
image data followed by pipeline execution. The pull down menu of
this button allows processing single, multiple or all stage
positions in a recording. To automatically load recordings the
last opened Multi-Dimensional Open
dialog is used, unless tags
are set for dialogs and a tag is set in the 'Input Image'
functions of the pipeline by selecting e.g. "[Multi-Dimensional
Open]#1" as Image Window parameter, where 1 is
the tag. In this case the Multi-Dimensional Open
dialog with the corresponding
tag is used. When [Actual window] set as Image Window
parameter, the pipeline
always starts processing with the topmost Image Window
after performing loading of image data.
-
Use the
PipelineDesigner/Run...
main menu item
-
To run a pipeline selected in the main
parameter bar, see instructions
here.
- Pipelines can be also run by the
 Load
and Run Pipeline
function.
Load
and Run Pipeline
function.
|
|
|
|
|
|
Toolbar
2. Select function to add with the
button, or use the
 add selected function
 |
 |
 |
|
|
Workspace
3. drop the selected function into an empty
area. Then, drop function onto its input.
Copy/ Paste/ Rename functions by right-click |
|
 |
|
Use the  button to lock the workspace, so function parameters
can be set without accidentally altering the
structure of the flow chart.
button to lock the workspace, so function parameters
can be set without accidentally altering the
structure of the flow chart. |
|
Red functions create/or return
with new image windows, so multiple red
functions can be the output of any function.
Black functions modify images
so only one black function can be the output of
an other function. |
Green functions result non-image
data, therefore not other function can be the output
of these functions. |
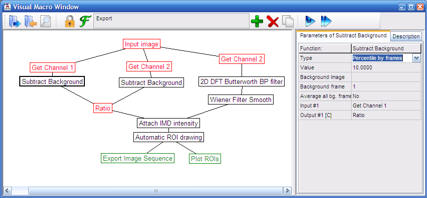
Parameters:
identical to the
parameter bar of the main window.
4. Click a function in the Workspace, then set image
processing parameters here. |
|
|
1. Always start with an
Input image (use
to add) |
 |
5. Run
pipeline |
| |
|
|
|
Modifying existing pipelines:
When an existing pipeline is opened in the Pipeline Window, the
editing of the pipeline structure is initially locked by the
toolbar button. If the pipeline has master
parameters, these can be edited in the function parameters section
of the Pipeline Window on the right, while the pipeline structure is
locked. Use the pull down menu of the
toolbar button to adjust the level of the lock, or
press the
toolbar button to unlock the pipeline.
- Select a pipeline in the Pipelines menu.
- Press the
main toolbar button to show the Pipeline Window.
- Press the
Pipeline Window toolbar button to unlock the pipeline.
- Follow the prompt to save the pipeline in the My
Pipelines folder. Note: the location of the My
Pipelines folder can be changed in the 'Set Folder
Locations and Default Open Method' dialog, that is
accessible from the File main menu. Contents of the My
Pipelines folder are also shown in the Pipelines menu.
- To rename the pipeline (the pipeline caption appearing in
the Pipelines main menu), press the
 toolbar button, and select the 'Pipeline Description'
tab in the bottom of the window. Change the caption. Press the
toolbar button again to hide the tabs in the bottom.
toolbar button, and select the 'Pipeline Description'
tab in the bottom of the window. Change the caption. Press the
toolbar button again to hide the tabs in the bottom.
- Click any function in the Workspace of the Pipeline Window
to edit parameters on the left.
- Follow the rules below to add or remove functions.
- To modify master parameters (the parameters, not their
values) press the
toolbar button and work on the 'Pipeline Parameters'
tab.
Pipeline editing rules:
- Always start with an input image. Multiple input image can
be used if the name (caption) of each image window is set in the
Input functions, or using
tagged
Multi-Dimensional Open dialogs.
In the latter case set the tag of the corresponding dialog in
the 'Input Image' functions of the pipeline by selecting e.g.
"[Multi-Dimensional Open]#1" as Image Window
parameter, where 1 is the tag.
- See available functions in the
Functions Glossary.
- Place new functions in an empty area, then drag and drop
onto their inputs.
- Functions with multiple inputs have to be dropped onto their
inputs ordered.
- Inputs and outputs can be reordered or deleted by clicking
them in the parameter list on the right, and then clicking on
the button appearing on the right:
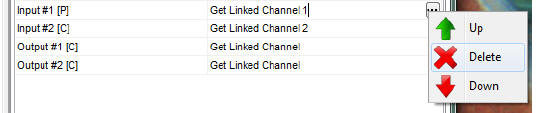
- Use right click to copy, paste or rename functions.
Functions can be arbitrarily renamed.
- Red functions are inputs, seek for certain channel or create
a new image. Multiple red functions can be dropped on any (black
or red) functions.
- In place operations are shown in black, these alter the
image data, so only one black function can be the output of any
function.
- Functions that do not produce image as outputs are shown in
green, so these are dead ends.
- The order of execution is unpredictable because of parallel
processing. Use
Wait
for all inputs if processing is needed to be synchronized at
some point, e.g. when defining and using reference images.
Rules of pipeline running:
- The pipeline processing starts from the input image(s) and
performed parallel where multiple outputs (red functions, like
Copy or Get Linked Channel) are present.
- The number of image processing threads that are actually
parallel processed can be set in the Preferences dialog.
- If a function requires multiple inputs, it will wait until
all inputs are ready. The processing continues on
other branches meanwhile.
- The flowchart is not fool-proof, the user have to make sure
that the processing is feasible, e.g. the inputs of a function
are not dependent on its own output, so there are no loopbacks in
the diagram.
- In the Pipeline not linked images can be processed
together, therefore the user has to ensure that co-processed
images have the same x,y,t sizes. Mismatched image size will
cause the pipeline to stall.
- Pipeline running can be stopped by pressing ESC or using the
 button.
- If the pipeline fails to run completely press the
button to reset it. The incomplete run is indicated by the
pipeline progress indicator in the main window status bar, or by
the incomplete graying of functions in the pipeline flowchart.
The currently processed function is highlighted in green.
Using pipeline master parameters:
The master parameters are the parameters shown in the main
parameter bar of Image Analyst MKII for the pipeline and control one or more
function parameters within the pipeline. Master parameters are used
to provide 'biological decoding' of pipelines functions for basic or
routine use of the pipeline. See tutorial here:
Adding master parameters
to a pipeline
Tutorials:
Overlay, align and
filter multi-channel image sequences and export as avi
Calculation of
fluorescence intensity ratio plots after channel and series
alignment and background subtraction, using automatic ROI drawing
Adding
master parameters to a pipeline
Notes:
- The Main Window and Image windows are responding to user
input during pipeline processing, and the currently processed
image windows are not protected for user interference. Therefore
it is highly advised to avoid any user input during pipeline
processing.
- The Pipeline does not offer flow control or substitution
of image processing parameters with variables (with the
exception of file naming). For a full powered scripting use the
Mathematica through Mathlink
feature. Through Mathematica all function parameters can be
fully controlled