Pipeline example
#1: Overlay, align and filter multi-channel image sequences
and export as avi
This is a step-by-step
tutorial for creating a simple pipeline to overlay three channels in
red, green, blue, add time information and export as an avi movie.
Then this is extended by adding and image stabilizer and smoothing.
- Open an arbitrary three-channel recording
- In the Main menu use the Pipeline/New
Pipeline window menu point or in the Toolbar use the
 button to open a new Pipeline window
In the Pipeline window:
- Press
 and select I/O / Input
image.
and select I/O / Input
image.
- Press
 to
and click on the empty workspace to add an "Input
image" function. In the Image Window
parameter the default [Actual window] appears,
so the input will be the top Image Window by the time
of pipeline execution. Change this parameter to the caption of
the Image Window to perform the pipeline on specific
Image Window. This parameter can be also used to
specify a Multi-Dimensiona lOpen dialog to receive
input image from. Use the Description tab to
toggle between the parameter list and the description of the
function.
to
and click on the empty workspace to add an "Input
image" function. In the Image Window
parameter the default [Actual window] appears,
so the input will be the top Image Window by the time
of pipeline execution. Change this parameter to the caption of
the Image Window to perform the pipeline on specific
Image Window. This parameter can be also used to
specify a Multi-Dimensiona lOpen dialog to receive
input image from. Use the Description tab to
toggle between the parameter list and the description of the
function.
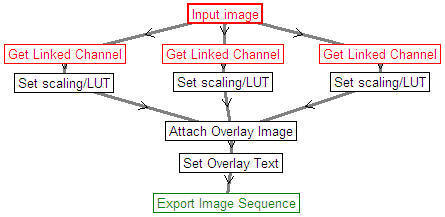
- Press
and select I/O / Get
Linked Channel.
- Press
to
and click on an empty workspace area to add a "Get
Linked Channel" function.
- Drag the "Get Linked Channel" function by
keeping the left button pressed and drop on the "Input
image".
- Repeat steps 4-5 twice more. Note that alternatively
use copy/paste of functions using the context menu.
- Click the first "Get Linked Channel". Set
the Channel (W) to 1 on the right.
- Click the second "Get Linked Channel". Set
the Channel (W) to 2 on the right.
- Click the third "Get Linked Channel". Set
the Channel (W) to 3 on the right.
- Press
and select Playback /
Set scaling/LUT.
- Similarly to steps 4-5 add one "Set scaling/LUT"
function to each "Get Linked Channel"
- Click each of the three added "Set scaling/LUT"
function and set the LUT parameter to Red, Green and
Blue, respectively.
- Press
and select Playback /
Attach Overlay Image.
- Press
to
and click on an empty workspace area to add an
"Attach Overlay Image" function.
- Drag the "Attach Overlay Image" function by
keeping the left button pressed and drop on the leftmost
"Set scaling/LUT" function.
- Consecutively drag the "Attach Overlay Image"
function over the other two "Set scaling/LUT"
function. Note the second two channels will be overlaid on the
first, and the output of this function is the first input.
- Press
and select
Playback / Set Overlay Text.
- Press
to
and click on an empty workspace area to add a "Set
Overlay Text" function.
- Drag the "Set Overlay Text" function by
keeping the left button pressed and drop on the "Attach
Overlay Image" function.
- In the parameter list of the "Set Overlay Text"
function set Show Time to Yes, Time justification
to right and Time X position to 90. The latter is a %
value of the width of the image.
- Press
and select I/O / Export.
- Press
to
and on an empty workspace area to add an "Export
Image Sequence" function.
- Drag the "Export Image Sequence" function
by keeping the left button pressed and drop on the "Set
Overlay Text" function.
- In the parameter list of "Export Image Sequence"
function set the Filename to =$LoadName$.avi. See
automatic file naming conventions by selecting the
Description tab. The file will be saved to the default
folder that can be set by first once manually exporting
something using the main menu. Set the Format parameter
to AVI. To suppress compression dialog, set compression
parameters in Preferences/Export and
uncheck Show compression dialog.
- Press
 to execute the pipeline on the top Image Window. Use
in the main toolbar to repeat this pipeline.
to execute the pipeline on the top Image Window. Use
in the main toolbar to repeat this pipeline.
- If using Multi-Dimensiona lOpen dialog and have
multiple stage positions, press
 to execute the pipeline in all or a subset of positions.
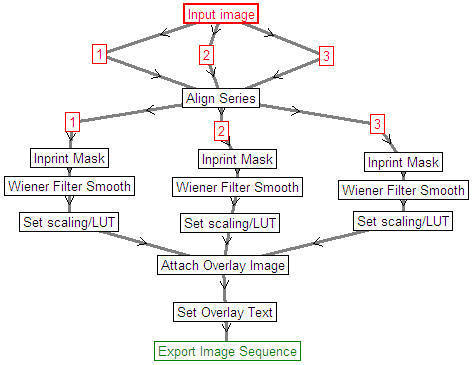
Next extend the pipeline with Image Stabilizer and Wiener smoothing:
- Starting at the bottom ("Export Image Sequence")
drag functions downwards to make space between the row
of "Get Linked Channel" and "Set
scaling/LUT".
- Press
and select I/O /
Align Series (Image Stabilizer).
- Press
to
and click on an empty workspace area to add an "Align
Series" function. For now use its default parameter
settings.
- Drag and drop the "Align Series" function
on each of the "Get Linked Channel" functions.
The image registration will be performed based on the first
input and all the three channels will be registered. The output
is the first input.
- To see which input is which, rename the "Get Linked
Channel" functions to the actual channel names. For
this click once the caption of the function and then keep the
pointer steady over the text. Rename the function from left to
right as 1, 2, 3
- Now click the "Align Series" function and
then any of the inputs in the parameter list. To reorder the
inputs use the button at the right side of the list, appearing
for the selected input. Notably, the first input of the
"Align Series" function should be the channel with the
best contrast. Alternatively a specially contrasted channel can
be created, e.g. by summing channels to perform the calculation
of image registration.
- Copy the three "Get Linked Channel"
functions, now appearing as "1", "2", "3" using the context menu
and drop each of them on the "Align Series" .
- For each of the channels now add
Editing / Inprint Mask
and Filters /
Wiener Filter by using
and
, consecutively one after other. Notably Align Series
generates masked pixels at the sides that may interfere with
subsequent processing. Therefore the Inprint Mask function is
used to substitute masked values with guessed pixel intensities.
Align Series has a crop function that is not advised to be used
with image exporting that - depending on the compression - may
require x,y dimensions divisible by 2 or 4.
- Finally connect the detached "Set scaling/LUT"
by dragging and dropping on the "Wiener Filter
Smooth".