This protocol describes how to conduct a reactive oxygen species (ROS) measurement in adherent cells using fluorescence microscopy of DCFDA [Di(Acetoxymethyl Ester) (6-Carboxy-2',7'-Dichlorodihydrofluorescein Diacetate)] and image analysis in Image Analyst MKII. ROS levels are expressed as a rate of DCFDA oxidation in %/sec normalizing the readout to 100% oxidized probe. A protocol is applicable to fluorescence microscopes capable of low-light level, time-lapse imaging. An internal calibration provides normalization for intracellular probe accumulation, that is otherwise a major confounding factor of the DCFDA assay.
Image Analyst MKII supports this assay with background subtraction algorithms for low light level imaging, image registration, background masking, ROI graphing and rate calculations. These functionalities are integrated into a single, click-and-run pipeline specialized for this assay.
Equipment
Microscopy requirement:
The assay works with wide field (epifluorescence), confocal and two-photon microscopy. The epifluorescence microscope has to be capable of low-light level time lapse imaging, e.g. equipped with a fast shutter and a sensitive monochromatic camera. Confocal and two-photon microscopes trivially work in low-light level mode. The image acquisition software must record accurate time stamps for optional rate calculation as 1/s. The assay protocol is given assuming that wide field microscopy and assay automation is used to capture multiple conditions in the same time.
Wide field microscopy:
Filter set: standard green emission (FITC, GFP), e.g. excitation 472/30 nm and emission 520/35 nm.
Confocal microscopy:
Two-photon microscopy:
| Reagent | Stock Concentration | Solvent | Storage | Supplier & Cat. # | Notes |
| Glucose | 1 M | H2O | RT | Sigma | sterile filter |
| H2O2 | 100 mM to 1 M | H2O | diluted stock is not stored | Sigma | freshly diluted from concentrated stock |
| carboxy-DCFDA-AM | 2-10 mM | DMSO | -20C | Life technologies, C-2938 | |
| Zosuquidar | 25 mM | DMSO | -20C | MedKoo or Sigma | |
| Na-sulfinpyrazone | solid | - | RT | Sigma | dissolve in assay medium if needed |
| IM (imaging medium) | see composition below | H2O | RT or 4C | sterile filter |
Imaging medium (IM):
| Substance | mM |
| NaCl | 120 |
| KCl | 3.5 |
| CaCl2 | 1.8 |
| MgCl2 | 1 |
| KH2PO4 | 0.4 |
| TES | 20 |
| NaHCO3 | 5 |
| Na2SO4 | 1.2 |
Note: Set pH to 7.4 using NaOH at 37ºC. Store medium aliquoted
in 50ml conicals at RT.
Assay protocol (given for LabTek 8-well chamber)
Handling and loading of cell cultures with DCFDA-AM.
Culture cells on optical quality plastic bottom or glass bottom plates with equal density when several cell lines are compared. For robustness cells are recommended at 90% confluence on the plates, attached firmly and flattened down. Cell loss is expected due to washes therefore low cell density is not recommended. A confluent culture will prevent accurate background subtraction during data analysis.
In a conical warm up sufficient amount of IM (e.g. 20ml for an experiment in a LabTek 8-well chambered coverglass)
Supplement the IM with and sterile filter:
2 mM sulfinpyrazone (optional, added as powder, incubate ~30min at 37C to dissolve)
zosuquidar 1 µM (optional)
BSA 0.4% (can be used with this assay, optionally)
glucose 0 to 25mM depending on the experiment - by default match the composition of the culturing media
Note: Sulfinpyrazone, an anion transporter inhibitor, and/or Zosuquidar is a multi drug resistance protein (MDR) inhibitor and these may be used when compared specimens show differing probe accumulation. MDR proteins pump out the uncharged form of the probe (DCFDA-AM). Therefore zosuquidar is used to prevent the differential accumulation. Upon accumulation of the probe inside, probe is deesterified by cellular esterases and become an anion which is locked inside the cells due the charge. The fluorescent DCF is also anion. Therefore sulfinpyrazone is necessary to prevent the pumping out either reduced or oxidized anionic form of the probe. Note: that sterile filtering is to remove debris from the medium that may interfere with fluorescence imaging.
Add 2 µM DCFDA-AM to 4 ml of supplemented IM (immediately before steps 5 and 6)
Wash cell once with supplemented IM.
Add the DCFDA-AM containing, supplemented IM to the wells (400ul/well for LabTek 8-well chamber) and incubate cultures for 30 minutes at 37ºC (non-CO2 incubator).
Gently aspirate the probe-containing medium and replace it with supplemented IM. Transfer the culture to the microscope. Note: keep the culture warm at 37ºC during this.
Imaging
Channel setup:
Standard green channel (FITC, Alexa488 or GFP)
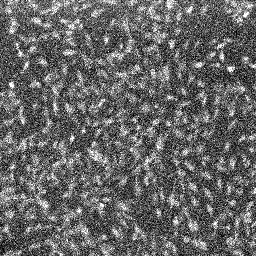
Set illumination intensity to see a very grainy, low light level image of the cells (see image below on the left), barely distinguishable from the background. Use the very bottom of the dynamic range of the detector, to avoid saturation during calibration with H2O2.
Record a time lapse for 20 min with 2 min frame intervals.
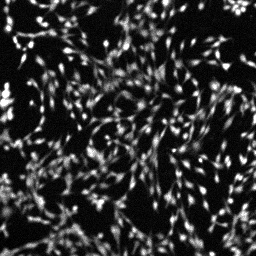
When the recording is stopped, add calibrating concentration of H2O2 ( 1-100 mM; typically 10mM). Note: H2O2 will oxidize all accumulated probe and reveal any differences in accumulation. Cells should not detach or change shape after H2O2 addition. Concentration of H2O2 is dependent on cell tolerance and have to be determined in a separate experiment or on the same experiment if sufficient number of wells are available for titration. If addition of any concentration of H2O2 causes cell detachment, 0.5 % glutaraldehyde + H2O2 can be used to fix the cells and oxidize the probe.
Record a time lapse for 20 min with 2 min frame intervals.
 |
 |
| DCFDA image at baseline in C2C12 cells (note the grainy appearance of the autoscaled image) | DCFDA image after H2O2 addition in C2C12 cells (autoscaled) |
 |
 |
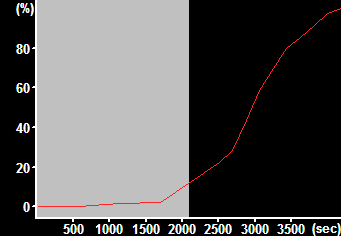
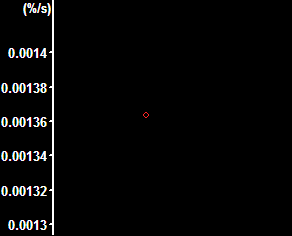
| Normalized DCFDA fluorescence with the baseline range selected | Rate calculated from the selection on the left. This is the output of the pipeline. |
Image analysis in Image Analyst MKII
Download tutorial image data set from the
Tutorials
page.
There is also a
video tutorial for this assay.
Open the recording (![]() )
by selecting both files generated during the two time lapses.
This results a Multi-Dimensional Open dialog if it was a
multi-position or microplate recording. Verify the file order in
the "File Order tab", and reorder if necessary. Switch back to
the "Open" tab.
)
by selecting both files generated during the two time lapses.
This results a Multi-Dimensional Open dialog if it was a
multi-position or microplate recording. Verify the file order in
the "File Order tab", and reorder if necessary. Switch back to
the "Open" tab.
Activate the "DCFDA normalized rate in all cells of a whole view field" pipeline in the Pipelines/Intensity Measurements/Applications main menu point. Note: this pipeline calculates the rate of increase in fluorescence intensity in a single channel, normalized to percents of the difference between the baseline and the endpoint. The rate will be calculated as %/sec of the full oxidation. The normalization is calculated based on the first n and last n frames where n is set in the Preferences/Misc/Normalization and DF/F0 panel. Background is subtracted, and cell-free areas, determined in a maximum intensity projection image are masked. The output is based on the mean fluorescence intensity of all cells in the view field.
Adjust the pipeline parameters:
Range for rate measurement: [important] Set here the frame range where the first recording (before H2O2) addition happened.
Background Level (percentile): Use a smaller background level (10-30 percentile) for confluent cultures and ~50 percentile for sparse cultures. Percentiles below 5-10 may increase noise.
Mask sensitivity (0.2-1.5): This sets the amount of background masking. At higher values only the brighter parts of the cells are measured, and more background is omitted from the mean fluorescence intensity.
Place positions into columns: This affects the layout of the data in the Excel Data Window
Load the images and run
the pipeline by pressing
![]() .
Note: optionally choose to process the the whole multi-position
recording. Note: see a typical
result above.
.
Note: optionally choose to process the the whole multi-position
recording. Note: see a typical
result above.
Save results in the Excel Data Window using the File/Save Excel Data Window main menu point.
Protocol by Irina Perevoshchikova and Akos A. Gerencser 07/30/2015
V1.0 ![]()
updated on 11/12/2015